Category Archives: GIT Organized

being shelve-ish

26th August 2015


IMG_1887

BEFORE

IMG_1894

BEFORE

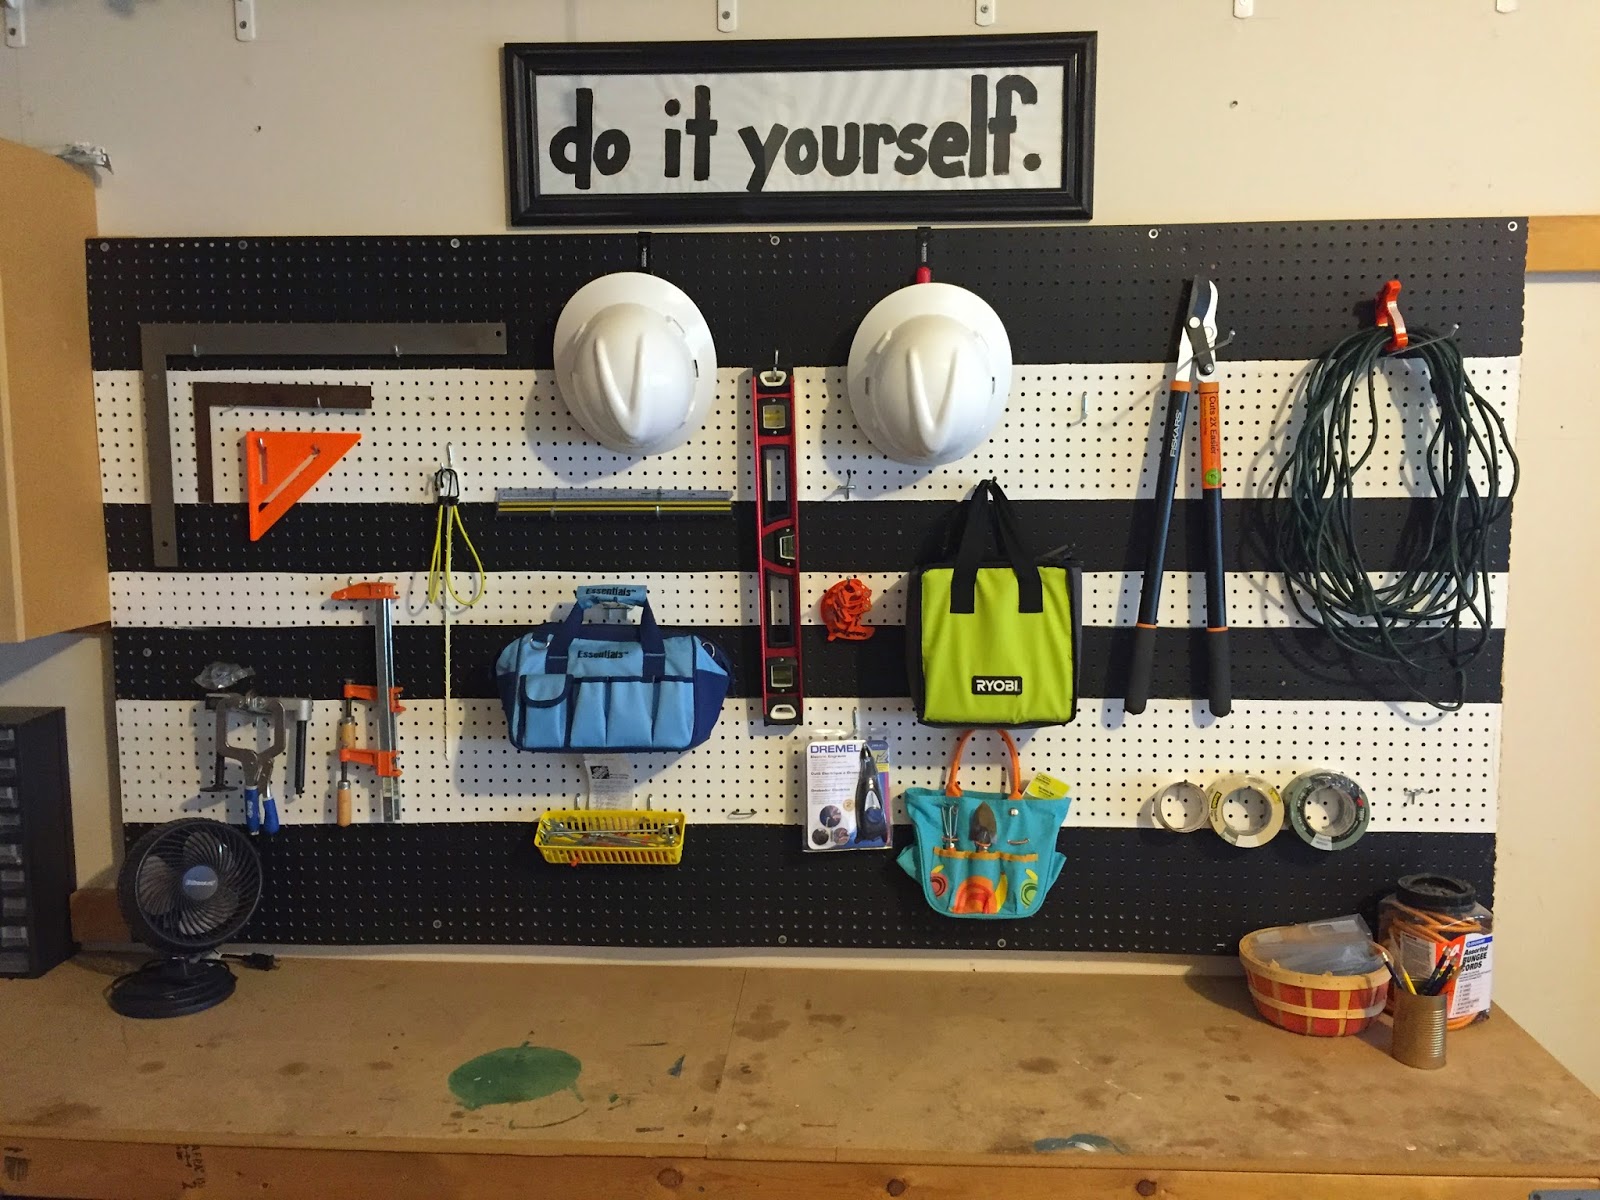
The previous owners made some really great shelves running along the walls in our garage but the only issue was that they were too high.  We needed a more practical and reachable shelf solution to house the garage items we were keeping in totes and crates.

IMG_1895

BEFORE

We purchased this black industrial shelf from Home Depot for about $60 which is an awesome deal for a 5 shelf, 48″X72″ set up.  We really liked black and felt that the particle board shelving would be sturdy and wouldn’t sag under weight. We also liked that we could fit 3 of my favorite Container Store Bins on each shelf.

IMG_8728

AFTER

Putting it together was fairly easy with two people and a mallet.  We ended up having to raise the shelving above the unit a little higher in order to use the top shelf, but that’s not an issue since those items are rarely used.

We sorted our garage items into several crates and these are the “categories” we came up with:

  • Sports-balls, gloves, etc.
  • Summer yard toys-water table accessories, bubbles, etc.
  • Car Wash-Soaps, rags, wipes, etc
  • Beach-bags, toys, floats, etc.
  • Light bulbs
  • Cooking-cedar planks, cast iron pots, lighter fluid, etc.
  • Cleats-Yes there is a whole bin of cleats because Joe is a hoarder
  • Other items on the shelf include a tackle box, empty crate, and ice chests.

IMG_8729

Now that we have organized the stray items floating around the garage and contained them into bins on the shelf, we have freed up more floor space and the garage feels less cluttered.

Still to do for the garage project:

  • Label bins, crates, and tool box
  • Hang decor-Joe’s football jersey, chalk board/message board of some kind?
  • Add address numbers to the door-see pinterest board
  • Take after shots of the space

measure up

12th August 2015

IMG_9365

I love the large wooden ruler growth charts that are popular right now and wanted to make one for our family.  How clever to use a detachable piece of wood so you can move it with you from home to home?  How many of you used actual walls and door jams??  Why didn’t we think of this!?IMG_9368

They are inexpensive, usually around $30-$40 for un-personalized, but we were looking for a simple project and an excuse to use our engraver tool we got for Christmas.

It turns out you can buy the perfect piece of 1X6 wood at your local home improvement store and go from there. No cutting necessary!

We stenciled out the numbers and ‘Pawelek,’ in a font we dowloaded from here, simply by printing them off the computer and tracing over them extra hard so it transferred to the wood.  We measured and drew the hash marks starting with 6 inches and ending with 6 feet 6 inches.  Next we used our handy dandy engraver tool to trace the hash marks, numbers, and our last name.

We decided to use a gray stain to be different but still neutral, plus we thought you could see our measurements better than if we used the darker stains found throughout our house. The stain didn’t sit as dark inside the engraved parts so I went back over with some black paint and then sanded it down for a softer look.

IMG_9366We found the perfect place upstairs by the kids’ rooms and bathroom and made our first marks,  Joe says every time we measure we have to take a picture so here we are!  Little did we know Joseph was 20 3/4 inches…

IMG_1352

IMG_1354

madeleine’s big girl room

28th April 2015

IMG_9378We moved Madeleine into the bedroom next to the nursery since Baby Joseph would soon be moving in.  This room is where all my ‘nesting’ took place this pregnancy and I had so much fun decorating with fun colors, especially the gold glitter!

IMG_9375

IMG_9387

IMG_9386


The furniture was handed down to us from our neighbors up the street and works perfectly for a little girls bedroom.  Check out this post to see how we cleaned them up good as new. The bedding is from Land of Nod and was one of M’s Christmas presents from Grandma and Papa.  The gold chevron curtains are from Francesca’s and the curtain rod was a standard size from Lowe’s that matches great with the wood finish on the furniture.

IMG_9379

The hooks on the back of the door were left by the previous owners (thanks!) and Joe framed an old college mirror to create this little dress up space.

IMG_9376

The collage wall is a collection of frames and items that I had already and a few things from Hobby Lobby, including the blue flower and ‘I’ll eat you up canvas.’ I made the flower garland myself! Stay tuned for a diy tutorial that is easy peezy!!IMG_9378

IMG_9374

Madeleine really likes her room and I’m glad the transition was a smooth one.  We moved in all her closet and dresser items around February and started getting her dressed, playing etc. in there about that time as well.  One night we were putting on her pj’s and she wanted to lay down and cover up with her flower sheets so we tucked her in and never looked back.  I cried because I wasn’t quite ready for her to sleep in there but she lead the way and did really great.  We purchased one of those slings for the side so she doesn’t fall out and I really think it makes her feel safe and sleep better.  Her nap time was a tougher transition but we are back to at least an hour nap each day. Whew!IMG_9385

IMG_9380

I’m excited to see Madeleine play and grow in her new room and I think the decor will adapt with her age for several years to come.  Look out for a post about organizing M’s closet coming soon!

baby joseph’s nursery reveal

16th April 2015

IMG_9337

IMG_9347

Our farmer’s market nursery for Madeleine, turned farm nursery for Joe Joe, is ready and waiting for his arrival!  We only made a few changes here and there thanks to our neutral palette of primary colors.


IMG_9341

New: cow print crib sheet, antlers above the crib, howdy and the tractor on the wall, metal ‘J’, and pictures from our diy maternity photo shoot, and a change to the sweet sign my sister-in-law made for M’s farmer’s market baby shower.

IMG_9340

IMG_9344 IMG_9345 IMG_9346
IMG_9349

Madeleine may be a little jealous of the new nursery because she absolutely adores cows and all farm animals really.  We hope you like it baby Joe Joe!

working magic

24th March 2015

I know I’ve raved about magic erasers before but I still am amazed every time I use them.  Madeleine is really into coloring but doesn’t quite understand that you can’t color everything, only paper.  I found her coloring on her Minnie Mouse car, her stool, and even the fridge.  At first I tried a warm wash cloth which worked on the plastic car but it took a lot of elbow grease.  It wasn’t coming off the fridge so I pulled out an eraser and BAM!  It wiped off so easily!!

I also used a magic eraser on Madeleine’s furniture in her new big girl room.  Our neighbors down the street have a daughter entering middle school and she was ready to get rid of her little girl bedroom set so they just gave it to us.  Major score because it is such good quality, great colors, and free. Thanks neighbors!  There were only a few scratches here and there so I took a Magic eraser and wiped down everything.  Take a look at the before (right) and after (left) of the drawers under the bed.

IMG_0715

BEFORE

IMG_0716

AFTER

I mean right?

For the dresser I cleaned out the drawers and lined them with this cool gold chevron wrapping paper.  I love this little trick because it’s so inexpensive and makes the drawers look so sharp. Here’s how I lined the nursery dresser and our bathroom vanity. All you need is wrapping paper and a washable glue stick.

IMG_0878

IMG_0882


IMG_0879

BEFORE

IMG_0881

AFTER

We did take a drawer to Lowes and color matched the paint for a few light touch ups.  You will see how it all comes together when I post about her big girl room soon.  Can’t wait to show you how everything turned out!

hang in there

17th March 2015

IMG_8725

We desperately needed some hanging organization in our garage.  We had tons of open wall space to utilize but for the longest time, our tools just leaned in a corner looking cluttered and hard to get to.

IMG_1889

BEFORE

Our solution was inspired by our home’s previous owner who installed garage shelving himself using lumber, so we used the same method and attached lumber to the wall and then secured various hooks for our tools.

IMG_6908

BEFORE

There are several hooks to choose from and we shopped around to find the ones we needed.  We ended up with one ladder hook, 4 ‘U’ shaped hooks for rakes and shovels, 3 clip hooks for brooms and skinny poles, and then several heavy duty utility hooks for items like our lawn chairs, washer boards, and small yard machines.

IMG_8724

AFTER

IMG_8725

AFTER

Each hook ranges in price from $2-$6 so we saved a lot of money on this project using scrap wood.  If you want a cleaner, sophisticated look, like this garage I did, you can purchase the tracks and coordinating hooks for about $200 from your hardware store.  A high end solution would be the Elfa collection from The Container Store.  They have a utility line that allows you to even add shelves and baskets to the tracks.  This is expensive but worth it!

IMG_0014

A great tip for hanging garage items is don’t limit your self to one row.  In our garage and the one I linked to, we used two rows of tracks which allows you to maximize your vertical space and provides flexibility for retrieving items off the wall.

IMG_8726

AFTER and you can see how it comes right up to our scrap wood storage


madeleine’s big girl room, before

25th February 2015


IMG_7000  The nursery isn’t undergoing a major transformation, so much of my ‘nesting’ has been in Madeleine’s big girl room next door.  Here are some before pictures of what it was as a guest room with my old furniture and college bedding, etc.

IMG_7001

I lovingly labeled this guest room the ‘craft room’ because I stored all of my crafting supplies, gift wrap, candles, etc in the huge desk, under the bed, and in the walk in closet.  I have relocated all of this to a closet in our third bedroom, but more about that later.

IMG_7002

Check out my Pinterest Board for M’s room here.  There aren’t a ton of pins because it’s still a work in progress.  All I know is that I want there to be room for toys and bright fun colors.  We were given bedroom furniture by our neighbor’s and Grandma and Papa gave M her bedding and curtains as part of her Christmas gift.

We’ve already come a long way in there but stay tuned to see!

tax time on your mind

4th February 2015

Are you getting mail that says “Important Tax Document Enclosed?”  I am too and here are some tips on how to stay organized this tax season.

  • Designate a folder and keep it  handy for collecting tax forms that come in the mail. During a free minute, gather documents you already have and will need, such as social security numbers for dependents, and keep them in  the folder as well.  When you are ready to file, the folder of forms is ready for you!
  • Save your log in info if using an online tax service such as Turbo Tax.  We used Turbo Tax last year and they have sent me a reminder email or two about my 2014 tax return.  Take that reminder as an opportunity to make sure you have your username and password.  Saved information from previous returns is a major time saver this year!

Important tax dates to remember:

January 31st was the deadline for your employer and bank to send your important forms like your W2, 1098, or 1099. Haven’t gotten it? Make sure you have the correct address listed with your human resources department and bank so these forms are guaranteed to get to the right place.

April 15th-Duh your taxes are due!

If you keep receipts, start going through them now.  I keep a small accordion file of receipts and one of the sections is dedicated to donation receipts that I can claim on my taxes.

IMG_6344 IMG_6340


Happy filing!

still doing laundry

28th January 2015

Last time I posted about our laundry room it was looking like this:

20140807_170930


Which is a giant step up from this:

IMG_6589

Well now it looks likes this!

IMG_8736

IMG_8741

Tasks still remaining on our Laundry To Do List included:

  • Touch up the trim and door paint
  • Make a countertop and stain the shelf to match
  • Purchase a frame or washboard to cover up the ugly connection box
  • Stage and Decorate??

Joe made the countertop out of cabinet grade ply wood from Lowe’s that he cut to size and stained with our ‘go to’ Jacobean color.  I was pretty leery of using ply wood because it’s rough and I wanted a smooth finish, especially when it came time to wipe off lint or fold on the surface.  The first go round was pretty rough, pun intended, so Joe used our sander on top of the stain to smooth it out and then added a coat of clear polyurethane.  There were still a few snags here and there so one more round of sanding and poly did the trick.  It is really smooth y’all!

IMG_6909


Installation was a piece of cake.  We took a few pieces of trim board and screwed them into the studs on each side wall.  We made the outside cut at an angle so you can’t see it when you look head on.  The counter top, once we got it in the door and under the cabinets, just slides right on top.  

**It’s important to note that the counter doesn’t go all the way to the back wall because the washer and dryer connections are in the way.  We also didn’t want to secure the counter with silicone or caulking in case we have to remove it to access the connections.  There are tons of solutions for working around the hoses but this one seemed to work best for us.

Since the connections come above the counter I wanted to cover them up tastefully so I had the idea to use an old washer board.  I found this one at Crate and Barrel for only $20 and it is the perfect disgu’size.’ :)

IMG_8735

IMG_8740

Joe also stained the middle shelf to match the counter and please check out my giant value size detergent.  I am still on my first one and am not missing buying the small detergents every other grocery trip.

IMG_6893IMG_8750 5.24.33 PM


Here’s a peek inside the upper cabinets.  There is still tons of room for storage but I love everything neat and tidy, much better than the pedestals.

IMG_8744IMG_8747IMG_8749 5.24.33 PM

Still left to do:

  • Touch up trim and door paint
  • And I’m on the hunt for a cute laundry room print, something like this

painted peg board

21st January 2015


One of the mini projects within the big honker garage project was to paint our peg board.  From a practical sense, this WAS just for fun and Joe needed some convincing that it was worth it but I think it turned out GREAT!  Is it me or do the thick stripes actually make it look less cluttered?? We used a sample of flat black paint and the stripes were very easy to create using the peg holes as a guide for the painter’s tape.

IMG_1889

BEFORE

BEFORE

IMG_7204

During

AFTER

BEFORE

AFTER